Are you looking for a free star pom pom bag charm pattern? Well then you’ve come to the right place! This pattern features little star pom pom charms that I think look absolutely adorable! They can be used on a bag, hung as a decoration, used as a bookmark, or added to any other project that you want to add a cute hanging star to. I actually created this pattern several months ago and I’m so in love with it that I am still using my charm on my bag!
Pattern tips
The yarn weight that you use for this project will change the size of the charm. I personally prefer my charm to be smaller so I use a super fine weight 1 yarn.
This pattern works well with any type of material, so feel free to use whatever type of yarn you have on hand for this bag charm! You can even try mixing different fiber material, like creating the star with cotton yarn and using a super fluffy yarn for the pom pom.
Click the image above to save this pattern to your Pinterest board for easy access any time!
Step-by-step guide on Youtube
More of a visual learner or feeling stuck? All of my free patterns have a Youtube video tutorial! I show you how to crochet it step-by-step. Also, the video includes a demonstration on making the pom poms. Check it out below!
✂️ Materials
The following is the yarn & hook size that I used in my video tutorial, but you can use whatever you’d like for this project.
✦ super fine weight 1, acrylic yarn
✦ worsted medium weight 4, acrylic yarn
✦ 3.25mm hook
✦ scissors
✦ darning needle
optional materials
✦ pom pom maker
✦ beads
📔 Abbreviations
Written using US crochet terminology.
mr: magic ring
st: stitch
sl st: slit stitch
ch: chain
sc: single crochet
hdc: half double crochet
dc: double crochet
fo: fasten off
blo: back loop only
**: repeat instructions between asterisks as many times as directed
( ): work the stitches in parentheses in the same stitch.
📄 Pattern
Star Plushie
I used super fine weight 1, acrylic yarn.
Rnd 01: create a mr, ch 1, 10 hdc, sl st to first hdc to close rnd
Rnd 02: ch 1, *(sc, hdc, dc, ch1), (dc, hdc, sc)* rep ** 5 times, sl st to the first sc to close, ch 1 and fo
Create two stars. On the second star, do not fo.
Sewing the star
Don’t forget that you can view my video where I demonstrate how to sew the star together.
Let’s begin by placing the two stars with their ws facing each other back-to-back. sl st the stars together through their blo.
When you get around to the last star point, fill the star with stuffing or yarn scraps to make it plushie. ch 1 and fo, leave a semi-long tail.
Shaping the star
In the step below we are going to use the tail to give the star more shape.
Step 1: Grab a darning needle and insert through in between two star points, going through the middle of the slit stitch we created. Pull the yarn gently out between two other star points and behind the line that was created from the front loops of our sl st sewing.
Step 2: Take your needle around the sl st sewing and insert it behind the front loops on the other side of the star.
Step 3: Insert your needle to another spot that is in between two star points behind the front loop. Slowly tug on the yarn to shape the last spot you were at until you reach your desired shape.
Repeat steps 2-3 until you’ve shaped all 5 spots. Carefully weave in the ends.
Pom pom creation
It’s time to create our pom pom! I switch to a thicker yarn for my pom pom, using a worsted medium weight 4.
You can have a lot of fun at this part and use as many colors as you would like! In the video demonstration I use two colors.
There are many different ways to create pom poms. Including using a fork, cardboard, or a pom pom maker. For my pom poms I choose to use a pom pom maker because I like how simple it makes the process. I’m also someone who will add pom poms to pretty much everything, so I get a lot of use out of mine. If you don’t have a pom pom maker though, you’ll be able to create them just fine using free diy methods.
Pom maker steps
I used a 1 3/8″ in diameter pom maker.
Step 1: Pom pom creation gets very messy! Place down some parchament paper or newspaper on your table for a quick and easy clean up.
Step 2: Pull one side of the pom maker open, take two pieces (or one, or however many colors you are using it’s the same process) of yarn and secure the yarn tails by wrapping the yarn around them. Keep wrapping very slowly, trying to keep your yarn even around the arch. You can let go of the tail after it is secure. Don’t leave any gaps and keep going back and fourth wrapping as evenly as possible. Wrap until you have a solid amount of yarn on the top of the arch.
Step 3: Cut yarn, wrap the tails around and use a darning needle to secure them through the yarn. Close that side and repeat steps 2-3.
Step 4: Close the pom maker. Cut the yarn around the circle.
Step 5: Cut a semi-long piece of yarn and place it around the pom maker in the center between the two sides. Tie a knot very tight and then wrap the yarn around again and tie more. Do this as many times as you would like to secure the pom pom. I usually do about 3 passes for mine and then I double knot on the last pass.
Step 6: Lift up the arches and pull the pom maker sides to release the pom pom!
Shape and clean the pom pom
On this next step we will be cleaning up our pom pom and making it even smaller. I used two 1.25″ in diameter wooden circles as a guide. I purchased mine on Amazon but you can also just use cardboard that you may have laying around your house. Cut out circles by tracing a quarter or something else circular. It doesn’t have to be perfect and it will get the job done.
Step 1: Place the pom pom between the two circles and carefully cut around to trim and shape the pom pom until your desired size. Take your time and be very careful cutting, I accidentally got cut when I was making this tutorial.
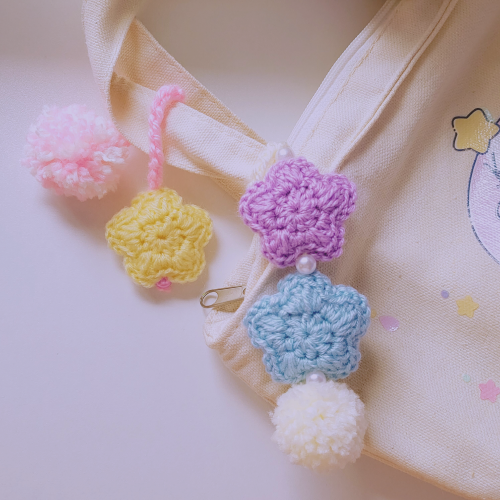
Charm design 1
It’s time to put our stars and pom poms together to create our charms! In the photo above there is two different charm designs. The first design on the left with one star is usable as a charm or a bookmark. That is the design we will begin with first.
I use a worsted medium weight 4 yarn.
Step 1: Create a slip knot and ch 20 or until you reach your desired length. You’ll want to ch much more if you plan on using this as a bookmark.
Step 2: fo, leave a semi-long tail (use the longer end for the pom pom side).
Step 3: With a darning needle, take one end of the tail through your stair. Inserting the needle through several times to secure it. Pull the yarn to the bottom.
Step 4: If you’re not adding a bead you can tie knots to secure the yarn. If you’re adding a bead, add it on through your darning needle to get the yarn through. Tie knots and cut the yarn close.
Step 5: Place the other yarn end on your darning needle and pierce through the middle of the pom pom with your darning needle and pull through. Thread the yarn through the pom pom’s center a few times to secure it. Come back up near the chain and tie a knot. Put the yarn through the center of the pom pom again and fo.
Charm design 2
Now let’s create the second charm design that has the two stars.
I use a worsted medium weight 4 yarn.
Step 1: First we are going to chain the loop. Create a slip knot. Chain 15 (or until desired length). Fo and leave a semi long tail.
Step 2: Place one end of the yarn on your darning needle and pull it through the first chain’s back bump to create a loop. Tie a knot.
Step 3: If you’re placing beads like I did, place a bead on the longer yarn tail and bring it up to the bottom of the loop. Bring your other yarn end through the bead.
Step 4: Insert your needle with both yarn ends through the first star and pull through to the bottom. Secure the shorter yarn tail through the star and then cut it.
Step 5: Insert another bead through the yarn.
Step 6: Bring the yarn tail through the top of the next star and pull it through to the bottom.
Step 7: Insert another bead through the yarn.
Step 8: Insert the needle through the center of the pom pom and secure the yarn by weaving it through a few times. Bring the yarn back up to the top and tie knots. Secure the yarn through the pom and cut it.
I hope you all have a fun time creating these cute charms. Thank you for reading and don’t forget to share this post with your crochet buddies. Until next time, byyyyye. ♥