This easy no-sew crochet mesh shrug is something I have been wearing constantly the past few months! I wanted to create a pattern that didn’t involve any sewing and would be easy for beginner crocheters to make. I love how this shrug came out, its incredibly comfortable and lets me add a little colorful style to whatever I decide to wear! It’s lightweight, breathable, and soft, so it’s good for wearing on hot days, but doesn’t feel uncomfortable on colder days when you want to wear long sleeves either. This pattern is made to measure so it will fit you perfectly.
Pattern tips
You can use whatever type of yarn you would like for this project but I recommend using something light and soft for best results.
For size reference, I usually wear a size medium.
Click the image above to save this pattern to your Pinterest board for easy access any time!
Step-by-step guide on Youtube
More of a visual learner or feeling stuck? All of my free patterns have a Youtube video tutorial! I show you how to crochet the top step-by-step. Check it out here!
✂️ Materials
The following is the yarn & hook size that I used in my video tutorial, but you can use whatever you’d like for this project.
✦ dk light size 3 weight yarn, approx 104g, I used this yarn for my project
✦ 5.0mm hook
✦ stitch markers
✦ scissors
✦ darning needle
📔 Abbreviations
Written using US crochet terminology.
st: stitch
ch: chain
rnd: round
sl st: slit stitch
sc: single crochet
dc: double crochet
bb: back bump
fo: fasten off
inc: increase
**: repeat instructions between asterisks as many times as directed
( ): work the stitches in parentheses in the same stitch.
Special stitch
mesh stitch: ch 1, sk 1 st, dc
📏 How to size the top
Think about where you want your top to fall on your shoulders. ch a number divisible by 4. sl st the ends together and try it on. This will be the top part of your shrug.
My total ch is 100 which was about 28″ inches when stretched.
Deciding where the shoulders go
Fold your ch in half with the tail end in the middle. Measure in about 2″ inches and place st markers, these 4 points will be where your shoulders are. Try it back on and see where the stitch markers fall on your body. Adjust the stitch markers if you need to.
Count how many stitches are between your stitch markers. That will be your shoulder number. Round up or down and make it an odd number (my shoulders are 17 stitches).
Write down your shoulder number and remove the st markers for now.
Figuring out the math
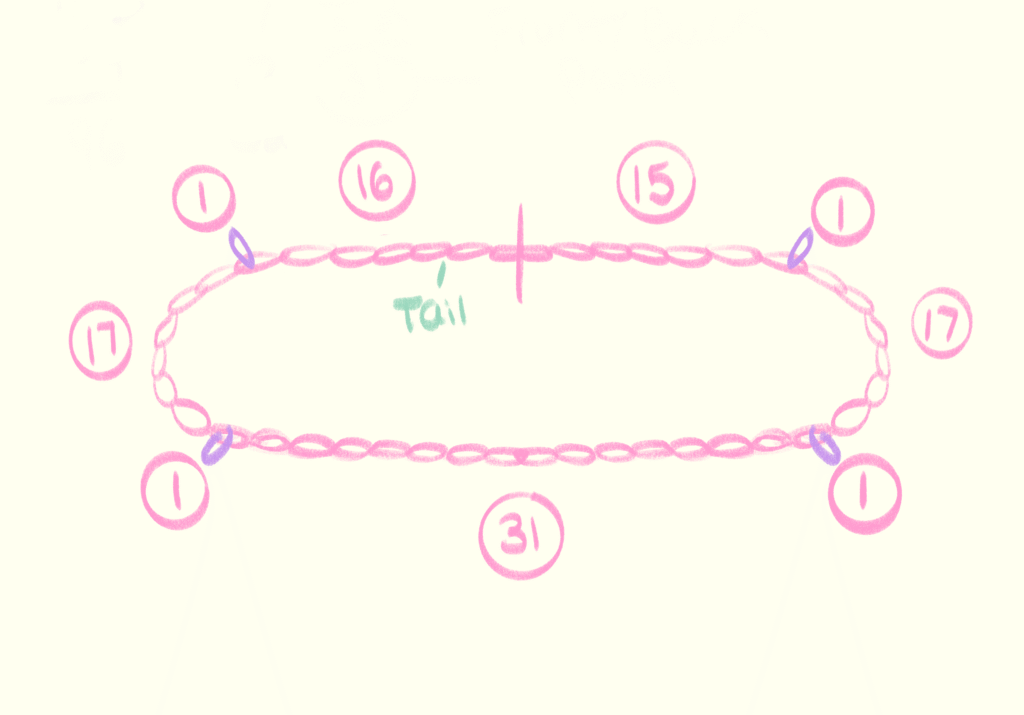
Now, we need to do a little bit of math. Don’t run away though, I tried to make this as easy as possible for you! Below is a sketch of how I split up my chain.
Take your total chain length (mine is 100) and subtract 4 (our 4 shoulder points). That gives me 96. Subtract your shoulder length twice (the number we wrote down earlier) mine is 17 and we will subtract that twice. That gives me 62. Then divide 62 in half which gives me 31. 31 stitches is the size of my front & back panels.
((total ch length -4) – shoulders twice) divide in half = front/back panel stitch size.
This part is a little confusing to explain, so you may want to refer to my video here for clarification. We are going to start our panel in the middle of the back so we need to split the back panel in half as seen in the sketch below. Since our back panel will not be an even number, we want to put the higher number where the bottom of our chain is with the tail end (which for me is 16) and place the lower number on the top of the chain (15 for me). You want your starting side of the round to be one number higher than the other side.
Placing stitch markers
With our math all figured out, you want to count around your chain and place the stitch markers for your four shoulder points. Start by counting your higher back panel number and then place your first stitch marker. Count your shoulder stitches and then place your second stitch marker. Count your front panel and then place your third stitch marker. Count your shoulders again and then place your last stitch marker. Count your remaining chains and make sure you have the correct remaining number of your back panel. As we work in the round we will be increasing at those four corner spots.
✏️ Pattern notes
✦ Work into the bb of the starting chain
✦ Chain 4 at the start of rounds (counts as a dc + ch 1) and turn work
✦ Finishing rows by sl sting to the first dc (the top of the ch 3)
✦ Increase by doing (dc, ch 1, dc)
✦ My top is 11 rows in total and my sleeves are 32 rows long.
📄 Pattern
Shrug body
Rnd 01: sl st the ends together, ch 4, sk 1 st, dc, **mesh st, inc at the 4 stitch markers** rep around
Rnd 02 – end of armpit/desired length: ch 4, turn, sk 1 st, dc, **mesh st, inc at the 4 stitch markers** rep around
Creating the arm holes
Rnd 01: sc in every st until you reach the first stitch marker.
sl st into the inc spot and ch desired # to create your arm hole. Keep trying on the top until you reach your desired size. Round up or down to make your ch an odd number. My ch is 17 for my arm hole. Place a stitch marker in the middle of your ch.
sl st to your second stitch marker. Continue to sc and repeat the same thing on the other side.
After making your second arm hole, continue to sc until you reach the end of the rnd.
sl st to the first sc to close the rnd and fo.
Try your piece on one more time and make sure you’re happy with the fit!
Sleeves
Rnd 01: create a slip knot, insert your hook into the middle of the arm hole ch and create a sl st to attach the yarn. ch 4, **mesh st** rep around, sl st to the first dc to end the rnd.
Rnd 02 – 03: ch 4, turn, sk 1 st, dc **mesh st** rep around
On round 4 I like to increase my sleeve because it’s a little tight for me. If your sleeve feels good you can continue to repeat rnd 02 and skip the increase rnd.
Rnd 04: (try to evenly place your increases around, don’t place too many we just want a slight increase in size, this is what I did for mine) ch 4, turn, inc into 1st st, **4 mesh st, inc** rep 2 times, 3 mesh st
Rnd 05 – 14: ch 4, turn, sk 1 st, dc **mesh st** rep around
Rnd 15 is at my elbow which is where I like to do my final increase. This part is completely up to personal preference you can increase drastically if you prefer, or you can not increase at all, it’s up to you! Below I put the increases that I personally did on my sleeves.
Rnd 15: ch 4, inc, **7 mesh st, inc** rep x2, 6 mesh st
Rnd 16 – 32: ch 4, turn, sk 1 st, dc **mesh st** rep around
fo, repeat the same thing on the other sleeve. Weave in ends through the stitches.
There we have it! I hope you love your new top as much as I do and it makes your wardrobe a little extra kawaii. Until next time, byyyyye. ♥